Instant GUI Customize!
Plugin Walkthrough
1. Introduction
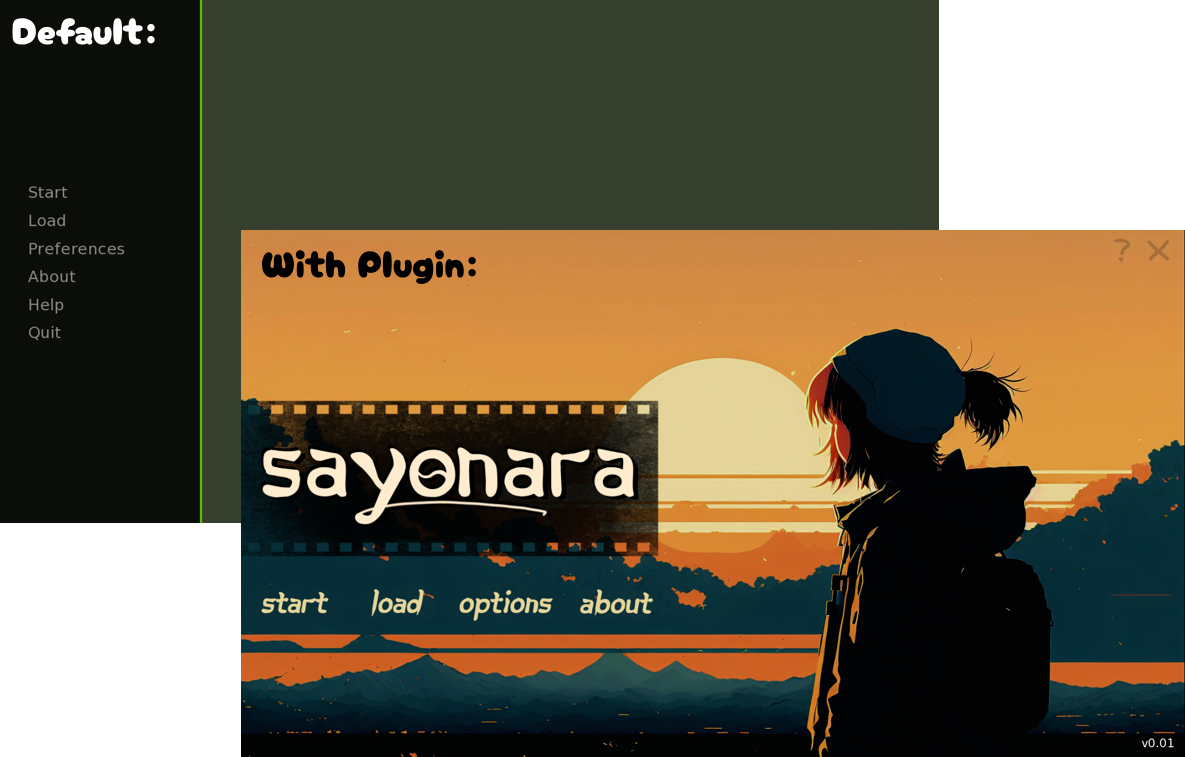
If this plugin caught your eye it is because you understand one thing about Ren’py games: you gotta stand out. Be it writing, visuals, sound or a combination of those, you have something to show the world and catching people’s attention is instrumental in that. In the pursuit of making your project pop, one aspect often overlooked is your game’s UI.
Ren’py’s default UI works fine, but when you’re trying to convey a vibe or theme, what the program gives you might come short.
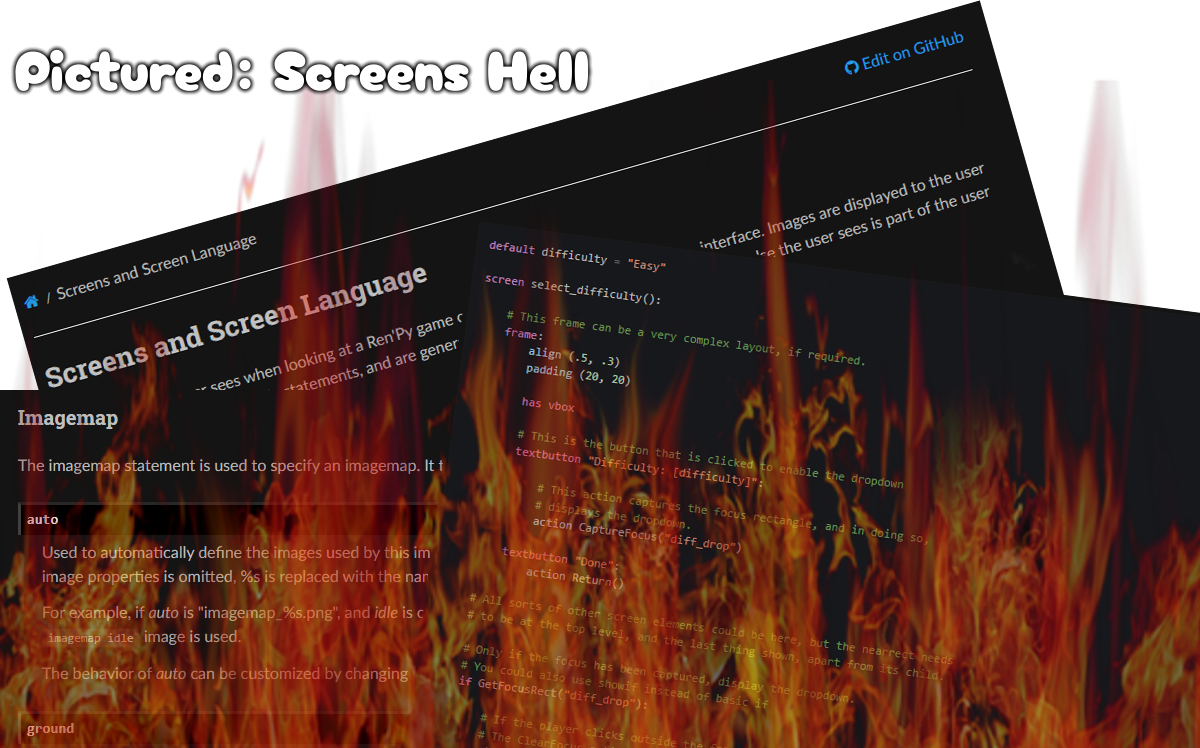
So, you may think, I can just make my own menus! Admirable and indeed many have taken that route and made some awesome work with it. However, if you go through Ren'py's documentation you may find yourself dealing with a barrage of terms, variables and code to make the UI of your dreams work. A state loving referred to as Screens Hell.
That’s where this Plugin aims to help you! The Instant GUI Customize Plugin is designed for beginners or people with little to no coding experience or skill and has the aim of minimizing / eliminating the need for coding. Using an easily customisable system and some basic image editing, you’ll easily be able to create much more unique menus that’ll help you convey your project’s vibes much better and help it stand out.
So let’s get it started! In this “Walkthrough,” you’ll find easy explanations of not just what you’re doing but also how you’re doing it which will help you understand Ren’py much better in an accessible, practical way.
This plugin comes ready for the customization of four Screens: the main menu, the quick menu, the dialogue box and the game menu. Proper definitions of these will come as we progress through this walkthrough.
Please note: as much as we go in depth here, there’s more information available in the comments within each script file (.rpy). There, you’ll find explanations for what each variable does. This guide is considered complementary to those comments and not a substitute for them.
2. Focus Masks
Before we go into anything it is important that you understand what you’re working with in this Plugin. A major component to how this system works is what we call “focus_mask.” That name may sound daunting, but this is as technical as we're gonna get here! The effect is actually already set up for you, even. In order to make your own menus, you’ll need to understand this effect.
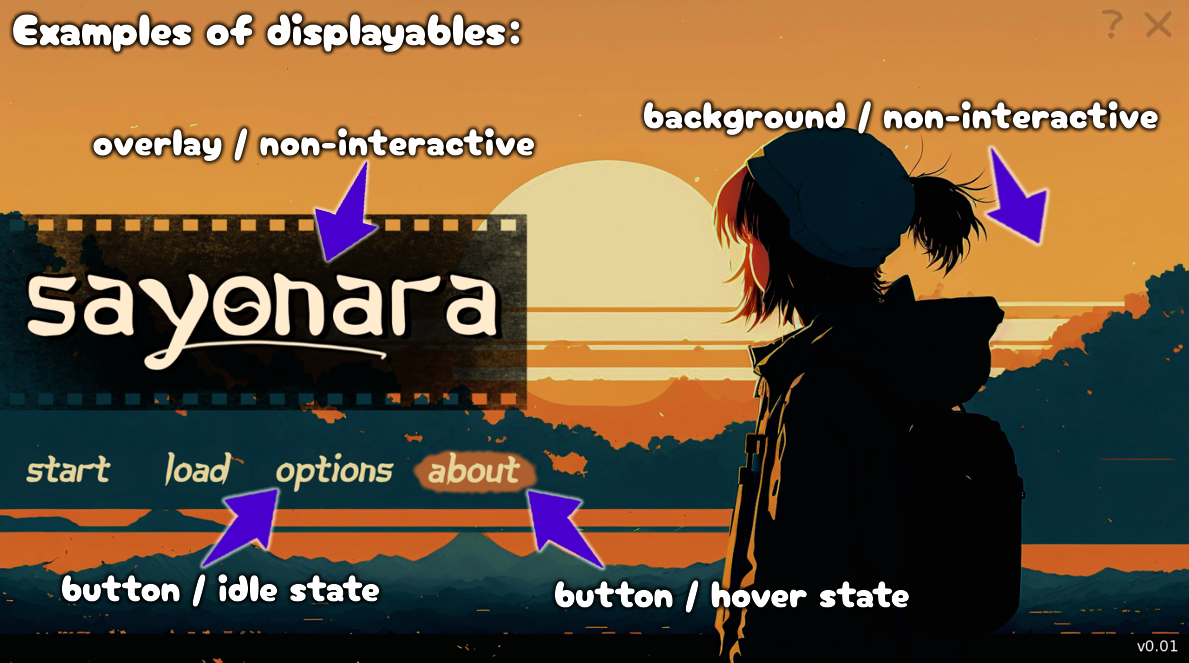
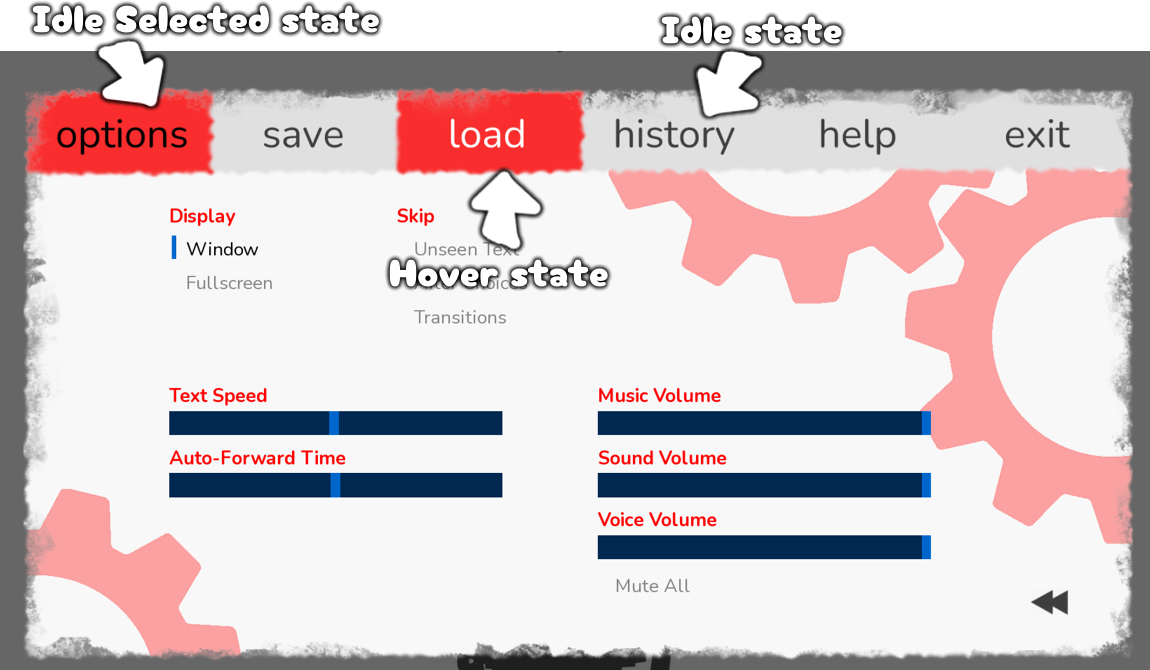
First, some nomenclature. When you’re working with the Plugin, you’ll be creating and customizing what are called Displayables, images that are displayed on screen. For our purposes, this will consist of interactive (buttons) and non-interactive displayables. In Ren’py these buttons are called imagebuttons because… they’re composed of images (wow!). Buttons can enter a couple of states, as they’re interacted with, but for a start let’s focus on two of them: idle (for when it's neither focused nor active) and hover (for when it's focused but not active, like when the mouse hovers over it).
With that, you probably got an idea of how these are made. We create these displayables and their variations as they’re needed and plop them on Ren’py… right? Well, no, because of the way menus (which Ren’py calls screens) work, you’d have to correctly place them on screen by coding positions and alignments, offsets and a lot more!
And that’s where focus_mask comes in.
If you’re artistically inclined, you may have heard of “Focus Area” before. In essence we are going to exclude transparency (empty space in a picture) and make only the “opaque” parts of the image have any effect.

The takeaway is that, in an image the size of our screen (usually 1920x1080), it’s gonna keep the objects’ size and placement on that image. So we can make Displayables within a “screen-sized” canvas and with a looooot of empty space and only the interesting parts will have any effect. No need for figuring out positions or sizes, or for trying to make your mock-ups work with coding!
With this, the basic steps become:
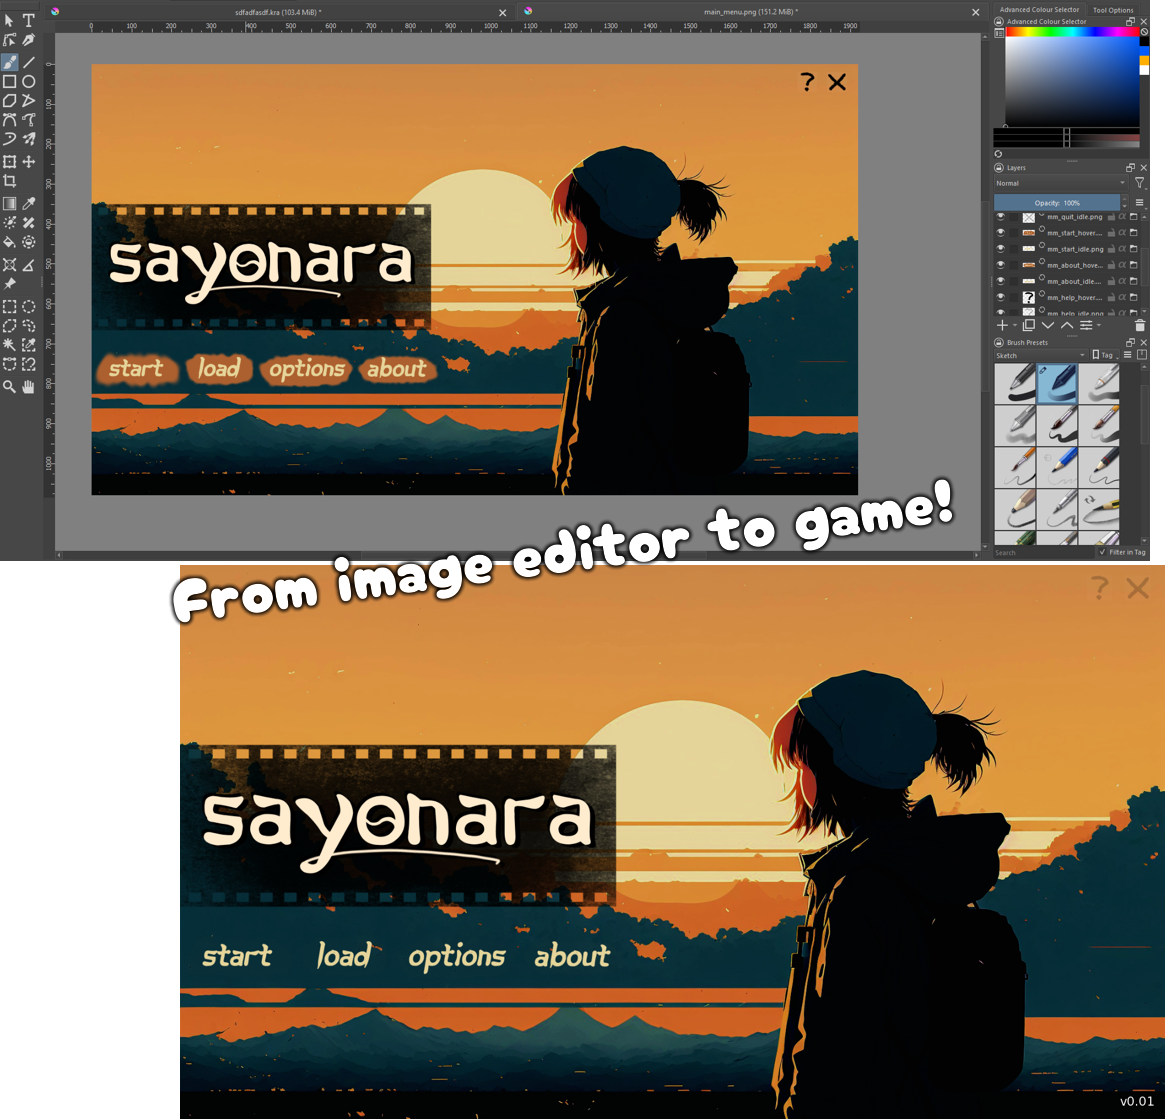
- Make your menu on an image editor (breaking down the individual displayables into different layers)
- Export each displayable and variations that apply as individual files (remembering to keep the whole empty space)
- Name them according to the Menu we are working with
- Organize these images in the proper folders
As you can see, we haven't gone in-depth about some of these yet, and that’s because they have unique steps to them depending on which menu we are working on. What you need to understand right now is you’ll be creating large images with a lot of empty space and focus_mask will make sure Ren’py only works with the interesting bits.
With these basic notions, you’re well on your way to making full use of this Plugin!
3. Importing the Plugin
Before we start, we gotta Plugin into the game. That’s extremely simple, we’ll go into our download, and unzip the main file. This should give us access to a bunch of files, but don’t worry, everything here can simply be put in the project's "game" folder (allow file overwrites if your computer asks you to).
And that’s all! If you open your game right now, it will already have all of the menus running on focus_masks and with the provided visuals.
Of course, the tutorial doesn’t end here. We want to customize these screens, yes? We’ll see how to do it case-by-case, but you may already be realizing how much easier this customization process is using this Plugin. We haven’t even touched a single line of code!
So, let’s get underway and see how to make our own menus within this framework.
4. Main Menu
The Main Menu is the first screen you’ll see when opening projects. It’s where you’ll find buttons like “Start” and “Load.”
Being the first thing your player will see when starting your game, it is pivotal to our mission of making our games stand out that offers something striking.
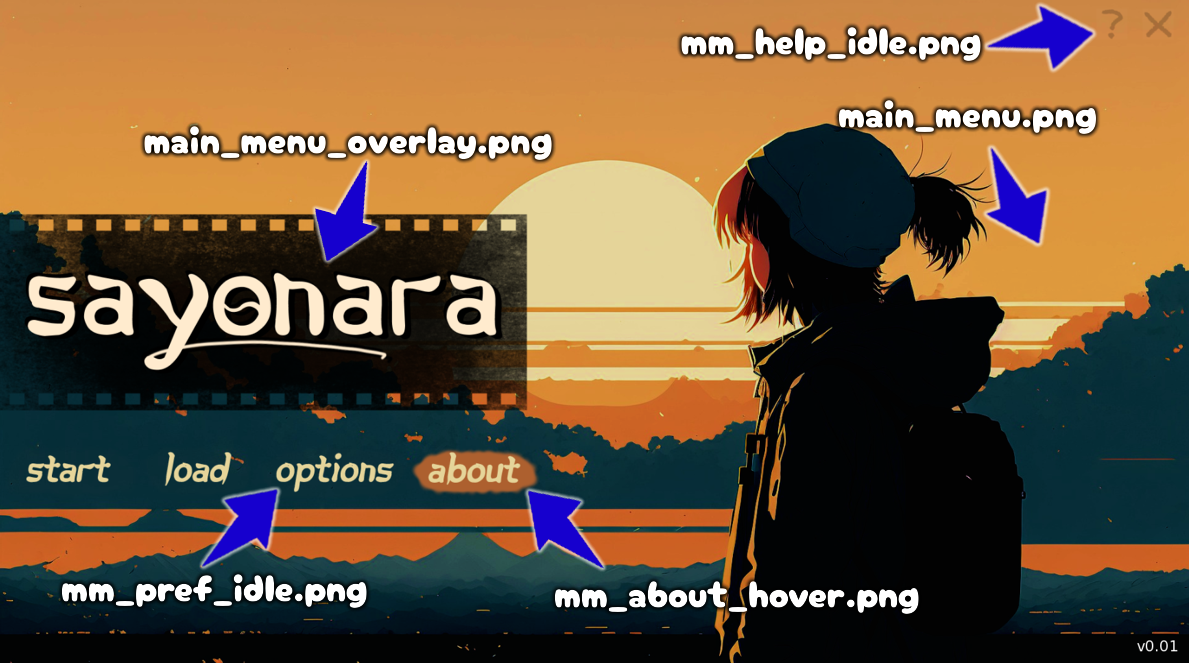
For a starter, we can identify which files will be affecting this screen by their name. In the “gui” and “audio” folder, they’ll either start with “mm_” or “main_menu_”. If we were to layer these images on top of each other they would form a single image that is the main menu.
The screen itself is composed of 4 types of displayable elements:
- Background: the lowest layer, usually the largest
- Overlay: the layer that goes above the BG, usually used for the tile or a logo
- Idle Buttons: buttons as they appear when inactive
- Hover Buttons: buttons as they appear as they have a mouse over them or when they’re touched
The Plugin has everything already set up for use, so when we’re customizing our screens, we only have to respect the names and the Plugin will handle it for us. Remember, each of these elements must be part of a large image, the size of our screen (commonly, 1920x1080).
To start, let’s go over the simpler, non-interactive elements on this screen. The background, as we touched on, is the largest image we’ll be using and it should fill the entire screen so we have a base for all other elements. The overlay goes directly above the background and can be used for a variety of purposes. Most developers use this for their project’s logo or title but it can also be used to create a small base for your buttons or even not used at all (a completely transparent image).
Backgrounds use the image name “main_menu.png” and can be found inside the “gui” folder of your project. The overlay is in the folder “overlay” which itself is in the folder “gui” and is named “main_menu_overlay.png”
Handling interactive displayables is a little more complex. We talked briefly about button states before, they’re images that change how the buttons look depending on how they’re interacted.
The Main Menu screen features six buttons:
- Start: Starts the game
- Load: Opens the Load screen, where players can continue the game from their saves
- Options / Preferences: Opens the Preferences screen, where volume and game speed can be adjusted
- About: Opens the About screen, where the credits usually go
- Help: Opens the Help screen, where the controls are explained
- Quit: Closes the game
We’ll be creating images of buttons for each of these actions and two versions of each button for each state they’ll have. So, 12 buttons in total to customize. These two versions must also be placed in the exact same spot on our canvas otherwise the focus mask won’t work properly.
When it comes to naming them, they all follow a pattern. mm_(action)_(state).png. All we have to do is replace (action) and (state) with what we want from the button.
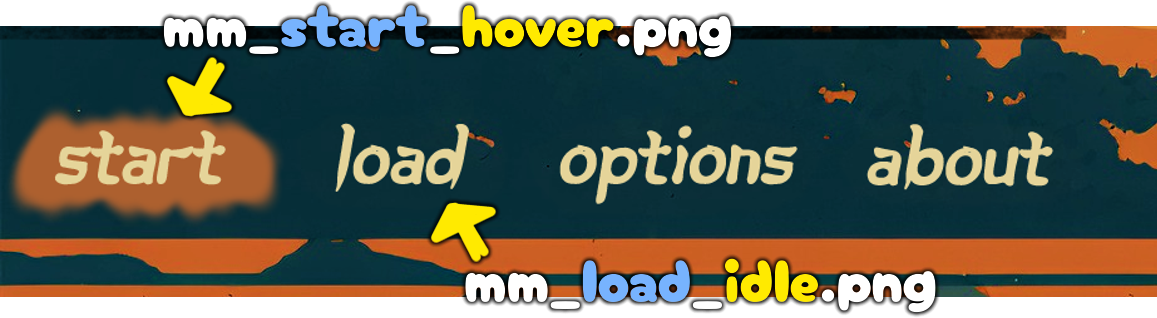
Here’s all the buttons and their respective file names, for reference.
Action | Idle file name | Hover file name |
Start | mm_start_idle.png | mm_start_hover.png |
Load | mm_load_idle.png | mm_load_hover.png |
Options | mm_pref_idle.png | mm_pref_hover.png |
About | mm_about_idle.png | mm_about_hover.png |
Help | mm_help_idle.png | mm_help_hover.png |
Quit | mm_quit_idle.png | mm_quit_hover.png |
Note that if you don’t want a “hover version” for your buttons, just don’t add a file that ends in “_hover”. When you do this, the “idle version” will always be displayed, even when hovered.
With that you should be able to customize your Main Menu! As long as you mind the size of your canvas, the positions of the buttons and file names when exporting, you should be able to easily bring those mock-ups to your game.
One final bit of customization available is sound. You can set two files for sound effects: one for when the mouse hovers over the button and another for when it activates. To change these you simply export them into the “sfx” folder which exists inside the “audio” of your project. By default they are: “click1.ogg” for hover sound effect and "click2.ogg" for the confirm sound effect.
If you’re not using .ogg sound files, you can open the main_menu.rpy file in your “game” folder and go to lines 27 and 28 which will allow you to change the sounds to whatever format and location you prefer. Alternatively, if you want to have no sound effects for your game, you can replace those file paths in lines 27 and 28 with "<silence 0.0>".
5. Dialogue Screen
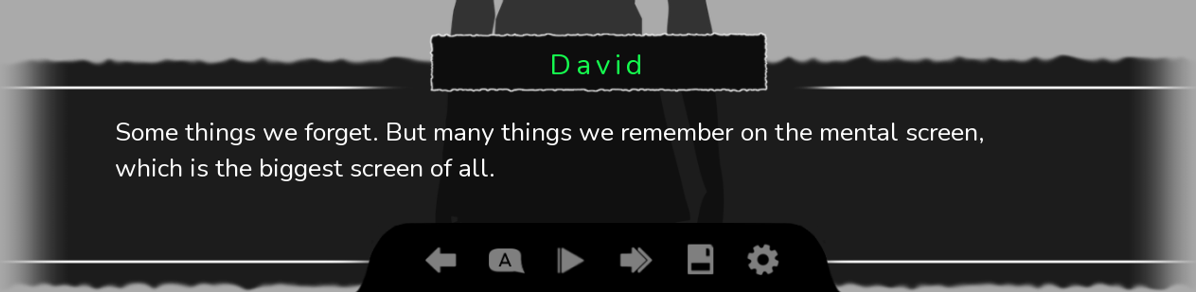
The Dialogue Screen is where characters’ dialogue, their names, and narration are displayed. Since players will spend most of the time with our projects on this screen, it is imperative for our mission of standing out that we customize this as well.

Traditionally, we can’t do much except change the textbox (where the dialogue and narration show up) and namebox (where the name shows up). With this Plugin, however, we can do a couple of more things to make our screens interesting!
Firstly, let’s go over the images. Unlike the main menu, there are no prefixes to identify these, but since we’re only dealing with three images, they should be easy to find.
- textbox.png: where the dialogue and narration are written
- namebox.png: where character names are written
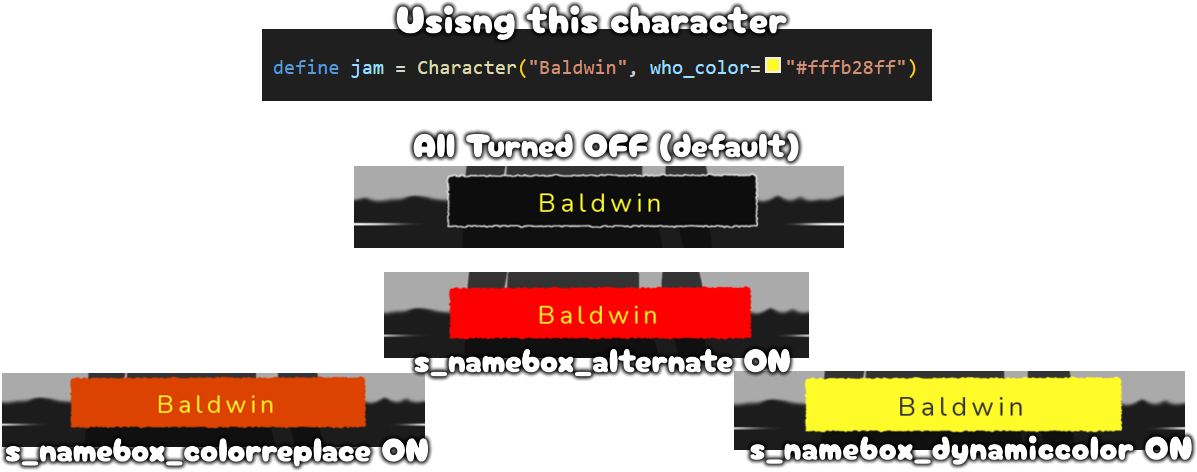
- namebox_alt.png: An alternative namebox in a solid color (we’ll get to what it does later)
These can all be found in your project’s “gui” folder.
For these we don’t use the focus_mask so this time your file should contain only the textbox/namebox without large, empty spaces. It’s recommended that you make your own menus based on the size and ratio of the provided pics, however, with a little customising, you can make any Dialogue Screen work.
So, what’s that “alternative namebox” for? The answer lies in the “dialogue_screen.rpy” which comes with this Plugin. At around Line 61, you’ll find the following options:

There already is some explanation in the file itself, but let’s briefly go over what they can do.
Turning s_namebox_alternate ON will make it so that alternative namebox (“namebox_alt.png”) is used instead of “namebox.png”. On its own this doesn’t have much of an effect, but it’ll be important for the following options.
If s_namebox_colorreplace is ON, the color of that namebox will be replaced by s_namebox_tint, a color we can customize a handful of lines below (line 74) or using dynamic-coloring (which we’ll get to). Turning this OFF will make it so that color is manually defined by changing hue, brightness, and saturation (Lines 77 to 85) and the text itself changes color based on the tint or a character defined color (who_color) (which is how Ren’py works by default).
And finally, s_namebox_dynamiccolor will make it so the namebox color becomes that tint from before or a character defined color. This is where the alternative namebox color is important. Its solid color can be manipulated easily by the Plugin, allowing us to have differently colored nameboxes without actually needing to make new individual namebox images.
To toggle each of these, you change them to either True (ON) or False (OFF). Beware these words must be Capitalized and not between quotes.
As you can see, all of these options have a symbiotic relationship with each other. For example, with s_namebox_alternate OFF, s_namebox_colorreplace won’t have much of an effect since it works by altering the color of the alternative namebox. Similarly, if s_namebox_colorreplace is OFF, s_namebox_dynamiccolor will do nothing, since its effect is predicated on whether we are replacing the namebox color in the first place.
We can think about it in terms of a hierarchy. With s_namebox_alternate at the top, s_namebox_colorreplace in the middle and s_namebox_dynamiccolor at the bottom. Whichever one is OFF, cancels out all effects below.
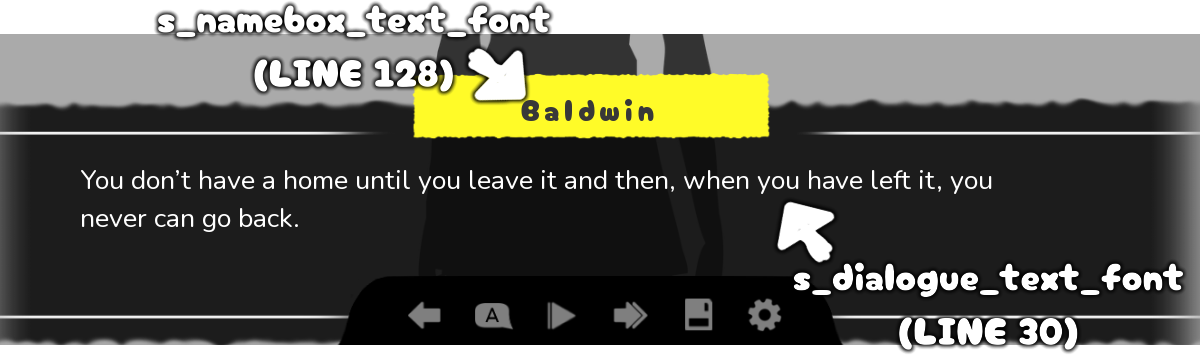
Lastly, let’s talk about customizing fonts. Fonts are another easy way to give our projects personality.
There are two fonts in our Dialogue Screen s_dialogue_text_font (Line 30) for dialogue/narration and s_namebox_text_font (Line 124) for the character’s names.
Remember to check the file’s path and name so Ren’py will pull from the correct font. In this Plugin, you have imported a “fonts” folder in your “game” folder, while not necessary, it’s recommended for the sake of organization.
Back to the code, you can see in the following lines A couple of options regarding three aspects of the fonts: size, color and (for nameboxes) an alternative color in case s_namebox_alternate is turned ON. Try out different sizes and colors to fit your project and give it more identity!
6. Quick Menu
If you got through the last section and wondered why we didn’t go into those buttons below the dialogue—well, aren’t you smart—it is because these are different Screens according to Ren’py. In the Quick Menu, you’ll find a couple of shortcuts featuring many actions that might be useful to readers as they progress through our games.

For customizing this Screen we are back to using focus_mask! You can find the buttons related to this menu in the “buttons” folder which can be found in your “gui” folder. See how they have lots of empty space? That's how focus masks work. The prefix for quick menu files is “qm_”.
Let’s take a look at all the actions for the buttons on this screen.
- Back: Returns to the previous line of dialogue
- History: opens the History Screen, allowing players to read the latest dialogue lines
- Skip: Toggles skip mode, going by lines automatically at fast speeds
- Auto: Toggles auto mode, going by lines automatically after a couple of seconds per line
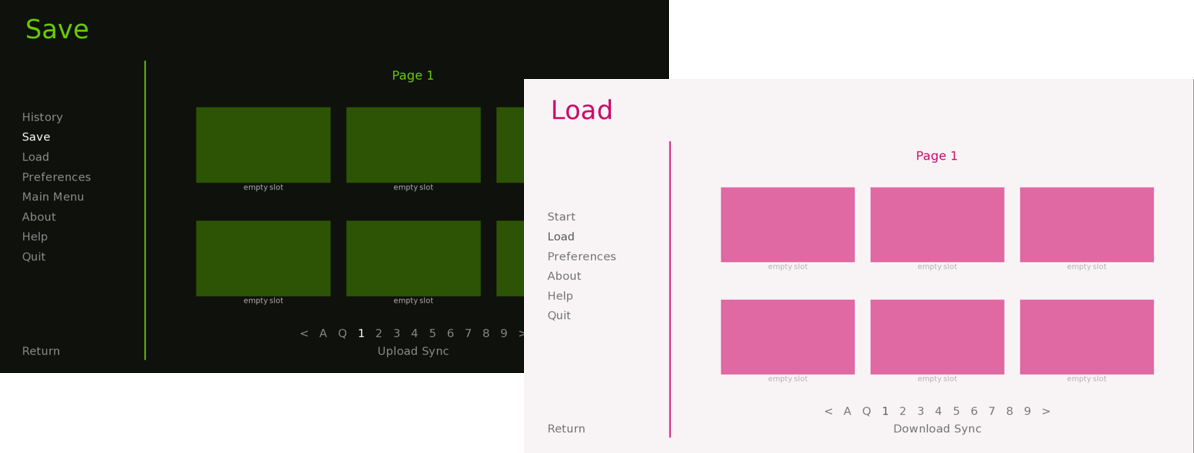
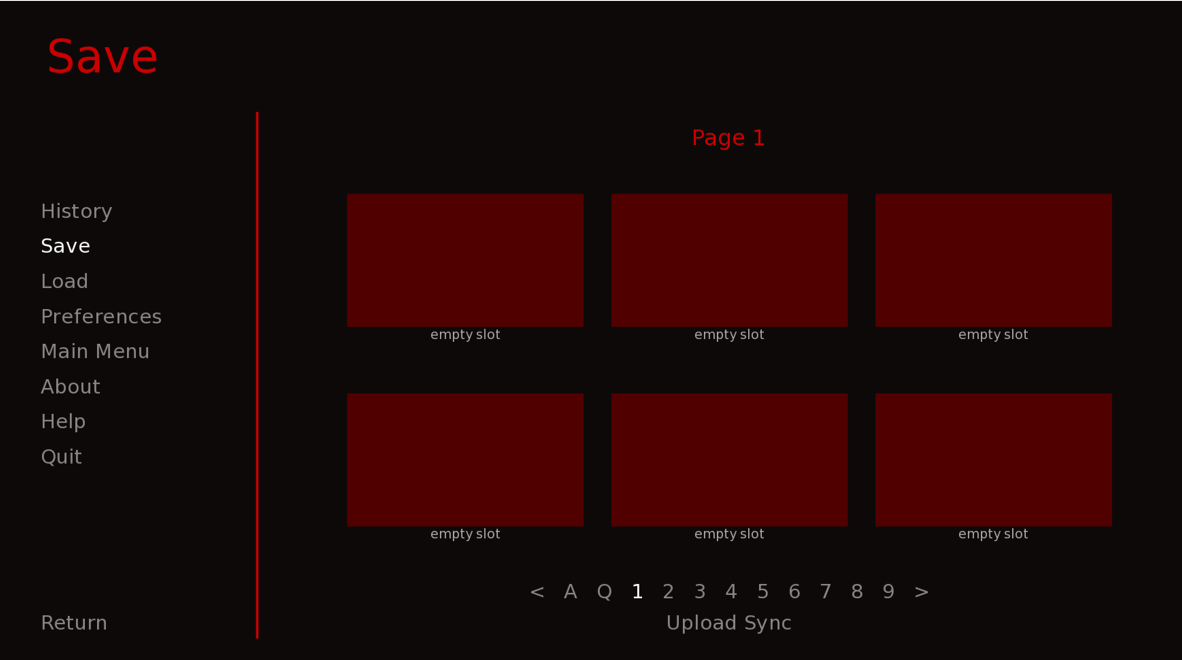
- Save: Opens the Save Screen where players can save their progress
- Options / Preferences: Opens the Preferences screen, where volume and game speed can be adjusted
These actions are very intuitive and their easy access makes the reading experience a lot smoother.
By default, these are all text buttons (buttons made of text instead of images), but with the Plugin we can make them image-based. Much like in the Main Menu, we have two states (idle and hover) for most buttons and six buttons. This time, however, we have two buttons with states we haven’t talked about before.
If you read above, you’ll see both Auto and Skip are toggles, that is to say, they have “ON” and “OFF” modes. We can have it so there are different images for when these modes are ON, these are called selected states. We combine that with idle (for when the mode is ON but not being hovered) and hover (for when the mode is ON and hovered/touched) to create _selected_idle and _selected_hover states.
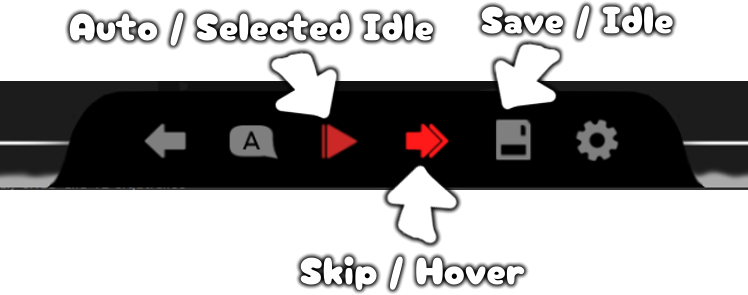
We can also not have this additional effect, in which case, we can simply not have “_selected_idle” and “_selected_hover” images. Doing so will make the “hover” image appear while these modes are ON and the “idle” image when OFF.
So, in total, we are dealing with 14 files. Here’s the reference for all of them:
Action | Idle file name | Hover file name |
Back | qm_back_idle.png | qm_back_hover.png |
History | qm_history_idle.png | qm_history_hover.png |
Skip (w/ selected) | qm_skip_idle.png qm_skip_selected_idle.png | qm_skip_hover.png qm_skip_selected_hover.png |
Auto (w/ selected) | qm_auto_idle.png qm_auto_selected_idle.png | qm_auto_hover.png qm_auto_selected_hover.png |
Save | qm_save_idle.png | qm_save_hover.png |
Options | qm_pref_idle.png | qm_pref_hover.png |
We can add some color to our buttons by going into the “quick_menu.rpy” file. In line 26, you’ll find this Plugin comes with 3 ways to colorize our buttons.
- Mode 0: No changes, they stay as they appear on the file
- Mode 1: Colorize buttons using a specific color (defined in Line 34)
- Mode 2: Colorize buttons based by manually changing hue, brightness, and saturation (Lines 37 to 45)
One last displayable you can add to the Quick Menu is a small overlay that goes under your quick Menu. “quick_menu_overlay.png” works with focus_mask and can be found in the “overlay” folder, which is inside the “gui” folder.
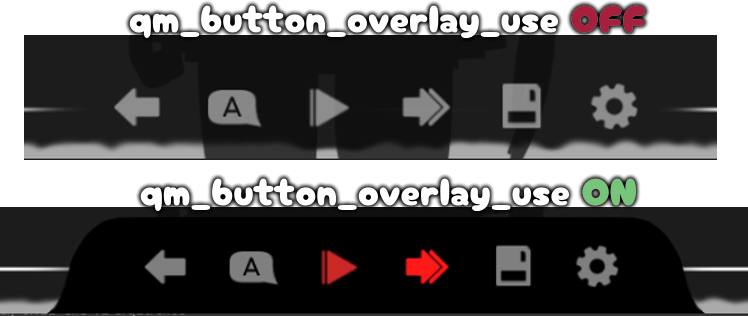
This is a good option if you want better contrast between your buttons and the background and another opportunity to further personalize your project.
Lastly, we can customize sound in this Screen too. Just like in the Main Menu, you can set a sound effect for when hovering the button (Line 16) and another for when the button is activated (Line 17). Remember to set the correct file path and that you can make it silent by replacing the file path with "<silence 0.0>”.
7. Game Menu
Now that we have seen the game’s first menu and the ones players will be spending most of the time with, it’s time we go through our last menu. The Game Menu is Ren’py equivalent to the pause menu in many games. Within this menu, the game stops and players can access a number of smaller menus for key features such as saving and and changing options. You may have already seen this menu from the buttons in the Main Menu. The Game Menu used there is the same as the one that appears in-game.
In truth (at least, as far as Ren’py is concerned), the Game Menu is actually a Screen working as a hub for other, smaller Screens. It contains these Screens in the form of tabs accessible through the buttons at the top (which is the actual Game Menu).
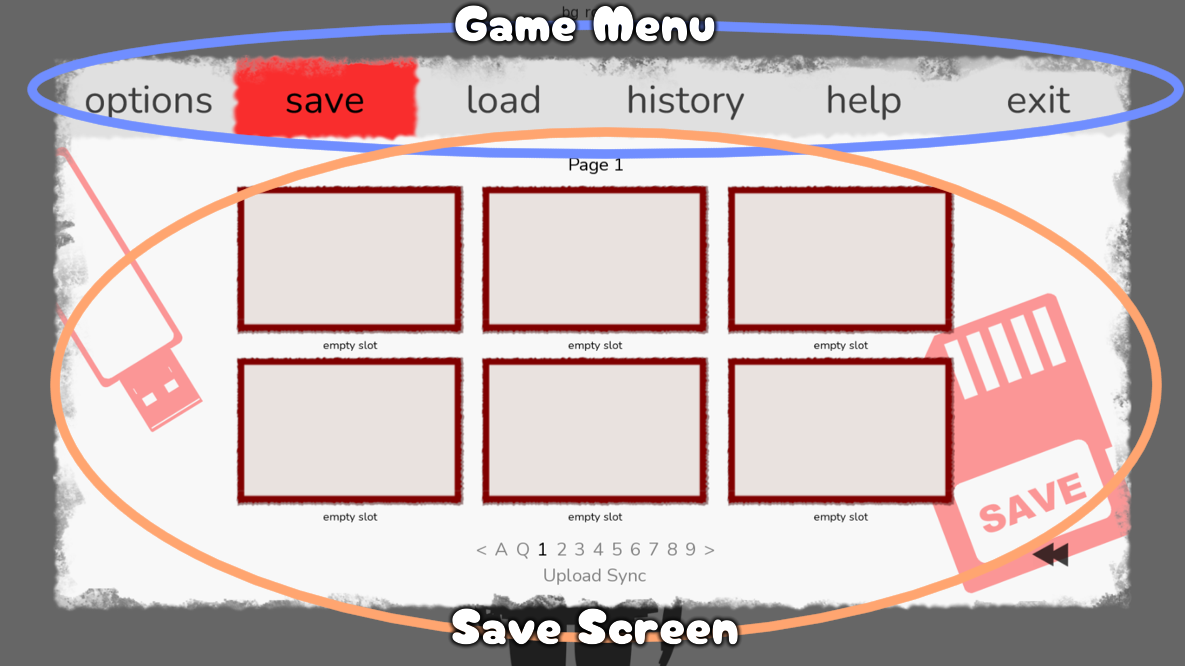
For the purposes of using this Plugin, we’ll treat all this as a single Menu and all customization can be handled in “game_menu.rpy”.
Now, let’s go over the images we can customize. The prefix this time is “gm_” and the files can be found in folders “buttons” and a dedicated “game_menu” folder, both can be found in your project’s “gui” folder.
First, let’s see our buttons (found in the “buttons” folder, of course!). Just like our previous Menus, we use focus_mask and create idle and hover versions of each button. In addition, we’ll also create selected_idle versions which will be used while the corresponding tab is open.
For buttons in the game menu, we have:
- Options / Preferences: Changes to the Preferences tab, where volume and game speed can be adjusted
- Save: Changes to the Save tab where players can save their progress (does not work on the Main Menu)
- Load: Changes to the Load screen, where players can continue the game from their saves
- History: Changes to the History tab, allowing players to read the latest dialogue lines
- About: Changes to the About tab,, where the credits usually go
- Help: Changes to the Help tab, where players can see the game’s controls
- Exit: Allows players to exit the game or to the main menu
Putting it all together, we have seven buttons and three states for each of them, making for 18 files in total. Here’s the reference:
Action | Idle file name | Selected Idle file name | Hover file name |
Options | gm_pref_idle.png | gm_pref_selected_idle.png | gm_pref_hover.png |
Save | gm_save_idle.png | gm_save_selected_idle.png | gm_save_hover.png |
Load | gm_load_idle.png | gm_load_selected_idle.png | gm_load_hover.png |
History | gm_history_idle.png | gm_history_selected_idle.png | gm_history_hover.png |
About | gm_about_idle.png | gm_about_selected_idle.png | gm_about_hover.png |
Help | gm_help_idle.png | gm_help_selected_idle.png | gm_help_hover.png |
Exit | gm_exit_idle.png | gm_exit_selected_idle.png | gm_exit_hover.png |
Note that in the files for this Plugin the About and History overlap with each other. The way it’s set up, the About button will only appear in the Main Menu and the History button will only appear if the Game Menu is opened mid-game.
One last button we haven’t talked about is the one responsible for the save files. There are three versions of this button based on three states: hover, idle and now insensitive. Insensitive is a state referring to buttons that cannot be interacted with. This is used on the Load Screen for empty save files, since they cannot be loaded.
These buttons for save files are:
- slot_hover_background.png
- slot_idle_background.png
- slot_insensitive_background.png
Now let’s move on to the contents of the “game_menu” folder. Here’s where we find the non-interactive displayables for the Game Menu.
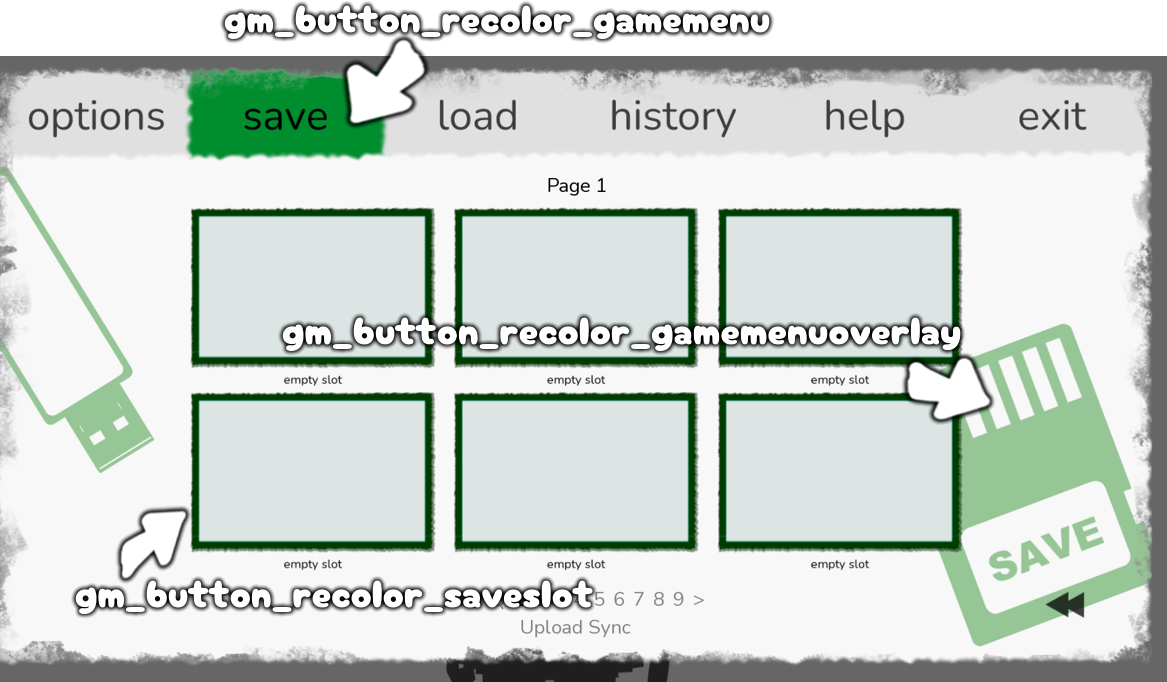
First, we have “game_menu_overlay.png”, despite its name, it works as the bottom layer of our Game Menu. This screen-sized image (1920x1080) will be shown in-game with some transparency, enhancing the pause screen feel of the Game Menu. This overlay’s opacity can be adjusted in Line 31. You can also do away with this overlay altogether by setting the “gm_overlay” (Line 30) to False.
Next, let’s talk about “game_menu_base.png”. As the name suggests, this works as the base of our Game Menu’s tabs. Meaning, Save, Options, Help and other tabs will appear above this. Though this doesn’t use focus_mask, the principle for making it is the same, a screen-sized image with the elements appearing in-game as they would in the file.
In this folder we can find a couple of overlays. These are displayed above “game_menu_base.png” and work to visually differentiate between the tabs of our Game Menu. They follow a simple naming pattern “overlay_(screen name).png”.
A reference for them:
Screen / Tab | Overlay file name |
Options | overlay_pref.png |
Save | overlay_save.png |
Load | overlay_load.png |
History | overlay_history.png |
About | overlay_about.png |
Help | overlay_help.png |
As you can see, Exit doesn’t have an overlay, this happens because it doesn’t have a proper tab attached to it.
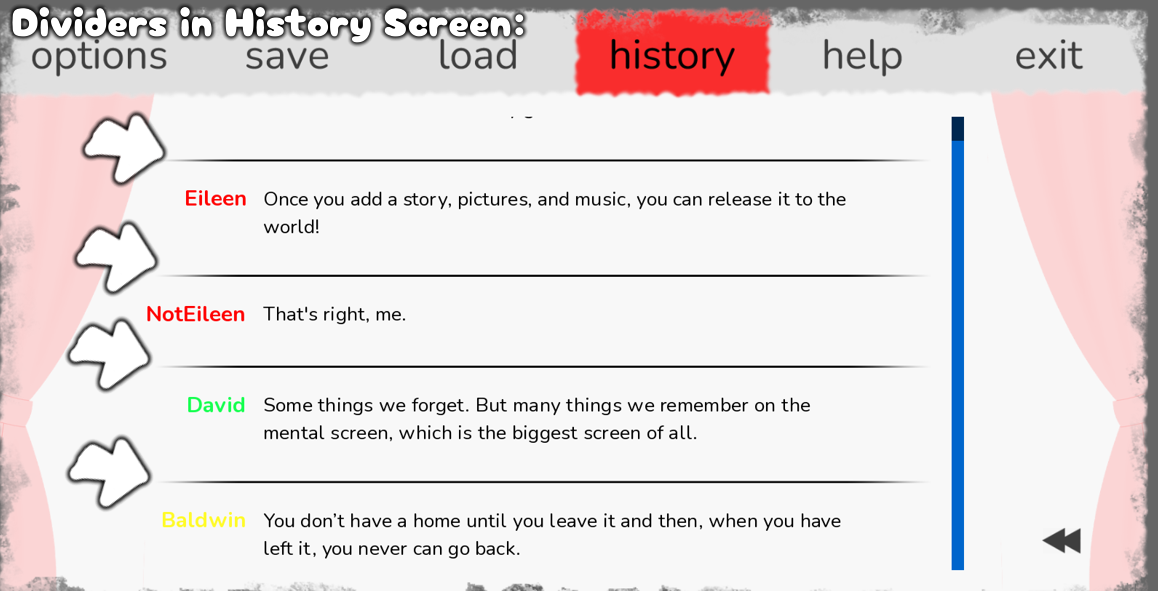
Last of the non-interactives in this folder are the dividers. These are much smaller and work as visual accents in the Help (help_divider.png) and History Screens (history_divider.png). When customizing this, it is highly suggested that you keep them around the same size so that the Plugin will work best with them.
This already gives us a lot of ways of customizing our projects, but diving into “game_menu.rpy” we can find even more ways to make our Screens unique. You can change fonts and color for Labels (Lines 78 to 80) and Text (Lines 83 to 85), and even add sound effects to buttons (Lines 107 & 108). But there’s one aspect that we also have to discuss.
From Lines 53 to 72, you can use the Recolor Mode. This allows you to change the color of buttons, overlays, save slots and even sliders and bars based on hue, brightness, and saturation.
If you’re using solid color elements (like the ones that come with this Plugin), you can use these configurations to see what color suits your project best without making new assets!
8. Conclusion
With this this Walkthrough comes to an end. Look through your project and you’ll realise how little of Ren’py’s default UI remains! By working these four Screens, we have made our project look completely different with very little coding.
Now that you understand how this Plugin works, you’re now equipped to succeed in your mission to make your project stand out and give it some personality.
In making your own menus, try to think about how your players are going to interact with it. Is this element too big? Too small? Is this font right? Is there a good contrast between this color and that one? These questions and many more are yours to discover and answer. Look into the files, see what you can do with changing settings.
The final step is yours to make. How will you bring that menu idea to life?
Leave a comment
Log in with itch.io to leave a comment.